Follow these links for Questions & Answers for DVFilm software products
Raylight Encoder Pro
Raylight Mac
RaylightMXFX
All Support FAQ
Monday, January 1, 2007
Raylight Ultra Install Issue on Windows 7
Users installing Raylight Ultra on 64-bit Windows 7 will experience a problem preventing the Raylight plugin from registering properly with Vegas 9. If you are running either the 32-bit OR the 64-bit version of Vegas 9 on 64-bit Windows 7, complete the installation as follows:
1. Locate the folder where Vegas 9 is installed.
For 64-bit Vegas 9 the default path is:
C:\Program Files\Sony\Vegas Pro 9.0.
For 32-bit Vegas 9 the default path is:
C:\Program Files (x86)\Sony\Vegas Pro 9.0.
2. Edit the file DVFilm.fio2007-config file using Notepad. If this file doesn't exist create it.
3. If you are using 64-bit Vegas 9 the contents of the file should contain:
[FileIO Plug-Ins]
DVFilmMxfPlug=C:\Program Files\DVFilm\Raylight Ultra 1.1.1\RaylightVegas90-64.dll
The Raylight Ultra installer will have left off the "-64" at the end of the plugin file name. Naturally, if you changed the default destination path for Raylight Ultra you will need to adjust the path accordingly.
4. If you are using 32-bit Vegas 9 the contents of the file should contain
[FileIO Plug-Ins]
DVFilmMxfPlug=C:\Program Files (x86)\DVFilm\Raylight Ultra 1.1.1\RaylightVegas90.dll
The Raylight Ultra installer will have left off the "(x86)" from the path name. Again, if you changed the default destination path for Raylight Ultra you will need to adjust the path accordingly.
5. Restart Vegas and it should now find the appropriate Raylight plugin to handle MXF files. You can tell if the plugin is installed properly by opening the Vegas explorer pane, and selecting a video MXF file. If the plugin is installed properly and the MXF file is a supported type (AVC-Intra coming soon!), then below the explorer pane, you will see information about the MXF file as well as "DVFilm Raylight Ultra" displayed.
This issue is caused by a failure to reliably obtain the installation path of Sony Vegas 9.0 under Windows 7.0. The issue will be resolved in future releases of Raylight Ultra and Sony Vegas
MXFX for Windows - "Failure to process 720/30p"
MXFX for Windows has a known bug and fails to initialize when processing 720/30p mxf files.
This bug is in the process of being fixed for the next update, but for now a simple workaround is as follows:
In the destination folder, create a new folder named 'card1.' Leave the MXFX Options set to the original destination folder (Do not set the destination to the 'card1' folder you created). Then click ok and start and MXFX should process the clip without a problem.
Usually, MXFX for Windows will automatically create this 'card1' folder in the destination folder, but due to the bug it has to be created manually.
If you have any questions please go to dvfilm.com/support.htm to place a support request.
Installing DVFilm software on a second computer
Q. Can I install DVFilm software on a second computer?
A. Yes. Our short and sweet license allows you to install on a second computer. The DVFilm License Agreement states:
A. Yes. Our short and sweet license allows you to install on a second computer. The DVFilm License Agreement states:
User agrees to make only one copy of the software for use on one computer system, or one workstation and one laptop per User. For more than 2 computer systems the User must purchase additional licenses for each computer from DVFilm or purchase a multi-system license.
Logging in Raylight
When Raylight is processing files, progress messages will be displayed in the output window. The output window can be opened by clicking the triangle in the main Raylight Window.
You can have Raylight display more detailed messages by setting the LogVerbose value to 1 in the file /Users/Shared/Raylight/options.txt:
LogVerbose = 1
You can have Raylight display more detailed messages by setting the LogVerbose value to 1 in the file /Users/Shared/Raylight/options.txt:
LogVerbose = 1
If you aren't receiving an email with the update link
DVFilm often makes free updates available. To receive an update you simply request it by filling out an online form. Links to the appropriate form for your application can be found here. For Raylight products the form is here.
Some of the fields on the form are optional, the most important field you must provide is the email address used when purchasing the software. Without it, you will not be able to receive updates. To request a change for the email on record, there is a charge of $8. You can go here to request this registration change.
Once the request for an update is submitted, an automatic email will be generated and sent to the email on record. If you do not receive the email it is most likely because your spam filters have flagged the email as spam. Check your spam folders, or add the email sales @ dvfilm.com to your safe list and request another link.
Problems when Final Cut Pro starts
Q. When I start FCP, even though I have told it to NOT load the last project, there is a long delay and I get errors about not being able to locate files.
A. This may occur if you had a project that used quicktime link files such as the ones created by Raylight, and those files pointed to are no longer available. With FCP closed, you might try clearing your FCP preferences.
This article explains how to clear the FCP preferences. Though it is for FCP 4.0 It is still applicable to the lastest FCP. I have pasted the contents below:
Here is another thread on the subject.
A. This may occur if you had a project that used quicktime link files such as the ones created by Raylight, and those files pointed to are no longer available. With FCP closed, you might try clearing your FCP preferences.
This article explains how to clear the FCP preferences. Though it is for FCP 4.0 It is still applicable to the lastest FCP. I have pasted the contents below:
Learn how to resolve issues caused by unusable preference files in Final Cut Pro 4.
When troubleshooting Final Cut Pro, one step you can take is to delete the Final Cut Pro preference files. Doing this restores Final Cut Pro to the default settings and behavior. These files contains user preferences for scratch disk settings, capture settings, window layouts, and so forth.
To delete the Final Cut Pro 4 preferences files, do the following:
1. Quit Final Cut Pro 4.
2. Click the Finder icon in the Dock.
3. From the Go menu, choose Go to Folder.
4. Type: ~/Library/Preferences/ Note: The tilde "~" refers to your home directory. For more information see "Mac OS X: Using Your Home Directory".
5. Click Go.
6. Drag the file named "com.apple.FinalCutPro.plist" to the Trash (Figure 1).
7. Double-click the folder named "Final Cut Pro User Data".
8. Drag the file named "Final Cut Pro 4.0 Preferences" to the Trash (see Figure 2).
9. Drag the file named "Final Cut Pro POA Cache" to the Trash (Figure 2).
[Be sure to Empty the Trash]
10. Open Final Cut Pro.
Here is another thread on the subject.
Activation problems
Once Raylight Encoder is installed, if it detects you haven't activated, you will be presented with an Activation Dialog. Just follow the directions on this dialog.
Serial Numbers, System IDs, and Activation
When you purchase one of our software products, we do not email you the product serial number. We add an entry in our databases with the email address you provided during the order process. This email address is very important and you must remember it.
At the end of the order process, we provide a link where you can download the software. Keep a copy of the downloaded software in a safe place, once you have downloaded it. You can also request the latest version of the software here:
http://www.dvfilm.com/update/
The software will display an activation dialog the first time it is run on a new computer. A unique System ID will be displayed identifying the computer. The System ID is generated by our software and cannot be edited or changed. You must provide your serial number for the software, and an activation code, in order to satisfy the activation dialog and be allowed to use the software.
With some of our products, a button is provided on the installer activation dialog to request the serial number be emailed to you.
Or, you can have your Serial Number emailed to you by filling out this form:
https://dvfilm.com/serial
On some products, a button is displayed to automatically request and fill in the activation code ("Request Activation Code"). On others. the activation dialog includes a button that will take you to the activation page: https://dvfilm.com/activate/ where you can generate an Activation Code for your specific computer, identified by the System ID you provide.
Once the activation code is filled in, press "Activate."
In Summary:
The procedure for activating a system that is offline is the same, however you must write down on paper the
At the end of the order process, we provide a link where you can download the software. Keep a copy of the downloaded software in a safe place, once you have downloaded it. You can also request the latest version of the software here:
http://www.dvfilm.com/update/
The software will display an activation dialog the first time it is run on a new computer. A unique System ID will be displayed identifying the computer. The System ID is generated by our software and cannot be edited or changed. You must provide your serial number for the software, and an activation code, in order to satisfy the activation dialog and be allowed to use the software.
With some of our products, a button is provided on the installer activation dialog to request the serial number be emailed to you.
Or, you can have your Serial Number emailed to you by filling out this form:
https://dvfilm.com/serial
On some products, a button is displayed to automatically request and fill in the activation code ("Request Activation Code"). On others. the activation dialog includes a button that will take you to the activation page: https://dvfilm.com/activate/ where you can generate an Activation Code for your specific computer, identified by the System ID you provide.
Once the activation code is filled in, press "Activate."
In Summary:
- Place your order online
- Download the software using the link provided on the order screen (or request the software HERE)
- Fill out THIS form to request that your Serial Number be emailed to you.
- Run the software on your computer and follow the instructions that appear in the activation dialog.
- Obtain an Activation Code by filling out THIS form.
- Store your Serial Number and Activation Code in a safe space.
- Enter your Serial Number and Activation Code in the Activation dialog
- You can now run your software without interruption.
The procedure for activating a system that is offline is the same, however you must write down on paper the
- system ID, using numbers 0-9 and letters A-F,
- the serial number, using letters A-Z, and
- the activation code, using numbers 0-9 and letters A-F.
Changing the output folder
Raylight Mac will store all generated files in the default folder /Users/Shared/Raylight. This is also where Raylight stores some system files that it needs including the options.txt file where settings for Raylight are stored.
To change where Raylight stores generated files such as Quicktime link files and P2 card images (P2Maker feature) you can edit the options.txt file and modify the OutputFolder option.
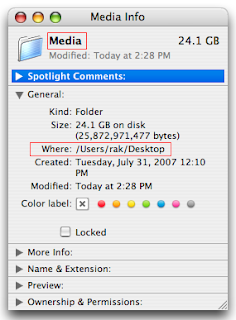
For example, if you have a folder on your desktop named Media you can edit options.txt and replace this line:
OutputFolder = /Users/Shared/Raylight
with this:
OutputFolder = /Users/rak/Desktop/Media
The folder path following the equal sign is the Unix file path representation of a folder. If you aren't sure what that is for a given folder, use the Finder program and highlight the folder you want to make the OutputFolder. Hold down the Command (Apple) key while you press the 'i' key. This will display the Info panel for the folder. You will see the folder path leading up to your folder next to the label "Where:". Type this folder path followed by the folder name, to the right of the equal sign leaving a space between the equal sign and the file path.
To change where Raylight stores generated files such as Quicktime link files and P2 card images (P2Maker feature) you can edit the options.txt file and modify the OutputFolder option.
For example, if you have a folder on your desktop named Media you can edit options.txt and replace this line:
OutputFolder = /Users/Shared/Raylight
with this:
OutputFolder = /Users/rak/Desktop/Media
The folder path following the equal sign is the Unix file path representation of a folder. If you aren't sure what that is for a given folder, use the Finder program and highlight the folder you want to make the OutputFolder. Hold down the Command (Apple) key while you press the 'i' key. This will display the Info panel for the folder. You will see the folder path leading up to your folder next to the label "Where:". Type this folder path followed by the folder name, to the right of the equal sign leaving a space between the equal sign and the file path.

Unable to view link files in Final Cut Pro
Q. When I try to open a .mxf.mov link file created by Raylight, Final Cut Pro appears to hang. Some symptoms:
If you have FCP set to load the last project and it is taking a very long time to load due to it trying to search for missing MXF files, you might want to move or clear the FCP preferences to allow you to start FCP. THIS post provides help in clearing FCP preferences.
- FCP displays "searching for data in [filename]"
- FCP appears to hang with a spinning beachball
- The original MXF files have moved
- The volume name where the MXF files reside has changed
- The volume where the MXF file resides is offline or not connected
- The folder name where the MFX files reside has changed.
- Launch Quicktime Pro
- Load a Quicktime link file created by Raylight
- From the menu, select Window...View Movie Properties
- Select the Resources Tab
- Review the path of the original .MXF file and make sure it is accessible at that location
If you have FCP set to load the last project and it is taking a very long time to load due to it trying to search for missing MXF files, you might want to move or clear the FCP preferences to allow you to start FCP. THIS post provides help in clearing FCP preferences.
Link files don't play back properly in Final Cut Pro
Q. Raylight creates the links, but the video is all white or all black, or random noise.
A. Delete the link and rescan the MXF files. Make sure each folder in the path to your MXF files has a folder name less than 32 characters. Make sure the drive is formatted Mac OS Extended if you use long file names such as file names with the MetaData "User Clip Name". Make sure you have the DVCPROHD components installed by FCP 5 or 6. They are in the Library/Quicktime folder on your system drive, six files that start with "DVCPROHD" and end with ".component". If the slate frame is visible but no other frames are, most likely the original MXF files have moved or the path to the MXF files have a bad character or uses a folder name greater than 32 characters. If your source files are stored on an external volume, try renaming the volume to a shorter name with no spaces or special characters.
Q: Links render OK in FCP but in real-time playback show up as black
A. Make sure the sequence settings for frame rate match the clip frame rate.
If you have clips with pulldown, remove the pulldown in Raylight when you scan them by using the pulldown removal option.
If you are importing clips of a different frame rate that have no pulldown (e.g. 60P clips into a 24P sequence), instead import the clips into a 60P project, then export a 24P quicktime in ProRes or similar format, then import the exported clip into your 24P sequence.
Subscribe to:
Posts (Atom)